Thursday, August 30, 2012

Movie Night Treat

Everyone knows that the best treat to eat while watching a movie is popcorn. But now it's time to get fancy..... Carmel corn. I know, it's mind blowing.

Carmel corn is actually very simple. I got this recipe from The Joy of Cooking which, for anyone who doesn't own it, is the greatest cookbook ever printed.

Here's what you need:
  • 3/4 cup popped popcorn
  • 1 1/2 tablespoons unsalted butter
  • 1 1/2 cups brown sugar
  • 6 tablespoons water
Here's how you make it:
  • First, melt the butter in a saucepan.
  • Add in the brown sugar and water, and stir over low heat.
  • Once the sugar has dissolved, turn the heat up to medium, and keep stirring until the caramel comes to a boil. 
  • Keep at a boil for only a few minutes, then drizzle the caramel onto the popcorn, mixing the popcorn so that it all is covered.


 Happy movie night!

Tuesday, August 28, 2012

Simple Striped Shirt

I know school is just around the corner, and there are lots of 'back to school sales,' but this year I'm trying to make everything I need for school at home. So as a first back-to-school item, I'm making myself a comfortable shirt. I found the tutorial for this shirt here

Here's what you need:
  • Striped jersey knit fabric (about 2 yards, just to be safe)
  • A shirt to use for measuring
  • Thread of similar color to your fabric
Here's how you make it:
  • Lay your fabric down, and lay your measuring shirt on top of it. Cut the fabric so it is slightly larger than the measuring shirt at the edges. You should have extra fabric to set aside.
  •  Now, make sure that the outsides of the fabric are facing each other, (inside-out) and that the stripes are lined up, then pin the sides of the fabric.
  •  Sew up the sides, making sure not to sew the sleeve openings and the bottom of the shirt.
  • Next, take the extra fabric and make two long strips of fabric that are about four inches wide. The strips should each be a little smaller than the bottom of the shirt. (Sorry about the drawings.)
  •  Fold each strip of fabric in half, then sew them together at each end.
  • Turn the already-sewn shirt inside-out. Pin and sew the strips to the bottom of the shirt.
  • Now all that's left is a few hems. Fold in the ends of the sleeves only an inch, then sew. Do the same to the other sleeve, and the collar.
  • Turn your shirt back right ways, (if you haven't already,) and you're done!


Monday, August 27, 2012

Doily Lampshade


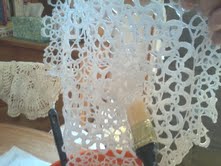
I was on Pinterest (one of my many obsessions) one day, just looking at the wonderful crafts people had posted, when I came across this stunning sight. It was a glowing light surrounded by beautiful lace! Immediately, I thought 'I have to make this!'

Here is a link to the website I found this project on: http://www.moredesignplease.com/moredesignplease/2011/3/4/diy-doily-lamp.html


Here is what you need:
  • A large balloon
  • A variety of doilies
  • Wallpaper paste (the powder kind, it works better)
 Here's how you make it:
  • Start by mixing the wallpaper paste together (as instructed on the box)
  • Blow up the balloon to the size you want the lampshade to be,
  • Then, using a paintbrush or your hands, coat the doilies in the paste, and lay them on the balloon, making sure the corners are slightly overlapping
  •   Continue until the whole balloon, except for a small opening in the top, is covered, and let dry overnight, or until completely dry.
  •   Once the doilies are dry, pop the balloon and take the popped balloon out, trying to keep the doily shell in the same form.

  • You can insert a lightbulb through the opening in the top of the lampshade.
  • Enjoy your new light fixture!   

Simple Dog Bed

My dog has needed a dog bed for quite a while now. We had gotten her a couple when she was a puppy, but for some strange reason, she grew! So now we decided it was time. We had to get her a new bed. But all dog beds big enough for her were REALLY expensive. So we took a trip to Joann Fabrics. We found the perfect fabrics for a dog bed at a great price (to my mother's delight). But we still needed the stuffing. A foam rectangle her size was even more costly then one of the dog beds sold at petsmart. It was terrible. We bought the fabric anyway, and hoped that we could find some pillows to stuff it with. Later, while we were at ikea we found cheap bed inserts, and thought to ourselves, "this would make great stuffing for our dog bed!" and it did!
  
This is how it turned out:


Here's what you need:
  • A few yards of fabric (depending on the size of your dog, I used about 2 yards for a 35 pound dog)
  • Thin bed insert
  • Sewing machine
Here's how you make it:
  • First, cut out two rectangles of the same size out of the fabric.
  • Turn the outside fabrics to face each other (so that it is inside-out).
  • Sew up three of the sides with the fabric still facing in, then turn it inside-out.
  • Put the bed insert in the pillow, then fold in the corners of the side that was open, and sew the whole side.
  • Tie the knots of the side you sewed, and enjoy!